Hello, please excuse all the white space in my tutorial. I am a basic blogger and have minimal computer skills. This took me a long time to post and everytime i pressed back space, something disappeared. LOL
I don't know how to get rid of the space so i guess i will live with it. Of course i don't know how i got the space either.
Hope you enjoy the tutorial anyway!
Tuesday, October 31, 2006
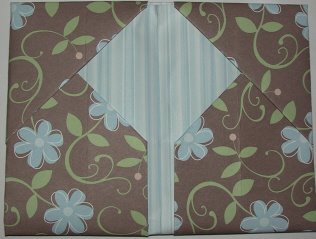
Here it is.............My first tutorial. I hope you can all understand it. What seems totally clear to me might not be to you. LOL Please let me know how this works for you. :)
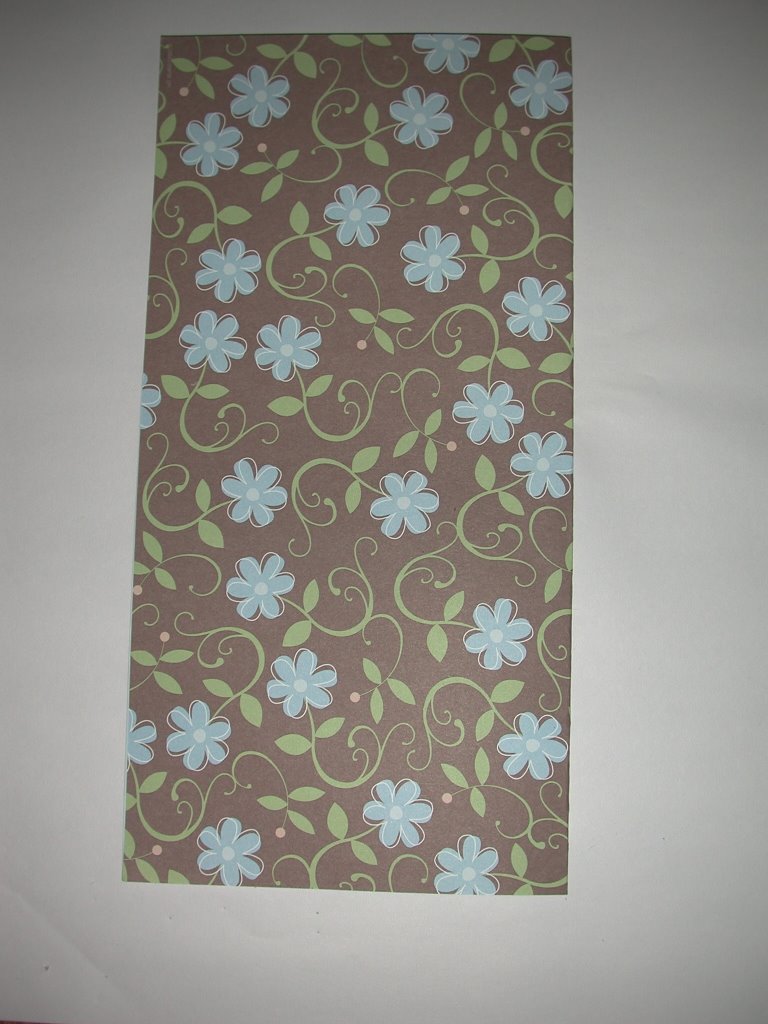
- Use a 12x12 piece of double side paper. You could use a one-sided paper that has no writing on the back or you could stamp it! Then fold it in 1/2. See that was simple.
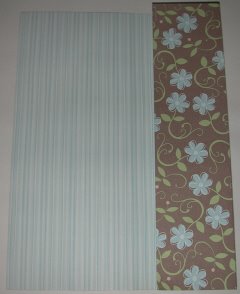
- Open it up. Fold the right hand side into the middle.

- Open it again and fold the right hand side to the fold you just made.
- Repeat on the left side.
- Make a paper hem on both sides that is approximately 1/4 inch. Just fold it over and press.
- Now here is the tricky part. Open the paper with the hem facing up. Now, fold the corner into the second fold line. Fold all 4 corners this way.
- Now fold the doors closed. You will have a rectangle.

- Flip it over. Bend the top back so it is even with the top of the parts you folded down.
Is that clear as mud?
- Now fold up from the bottom and slip the ends into the corners you have created at the top. This picture only shows it pushed in 1/2 way. You need to slide it in all the way to the top. Like the next picture beside it.


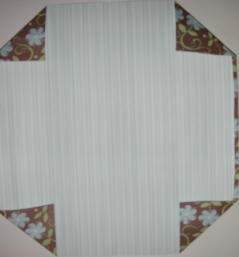


10 Then fold it in 1/2 and you have it!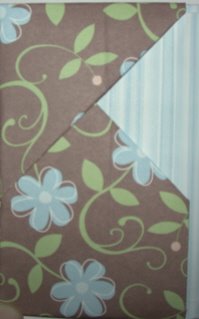
Sunday, October 29, 2006

 Ok, I am not an expert at moving pictures around in a blog. In fact it is quite frustrating but, I think how fun this project is, makes up for not having perfectly placed pictures.
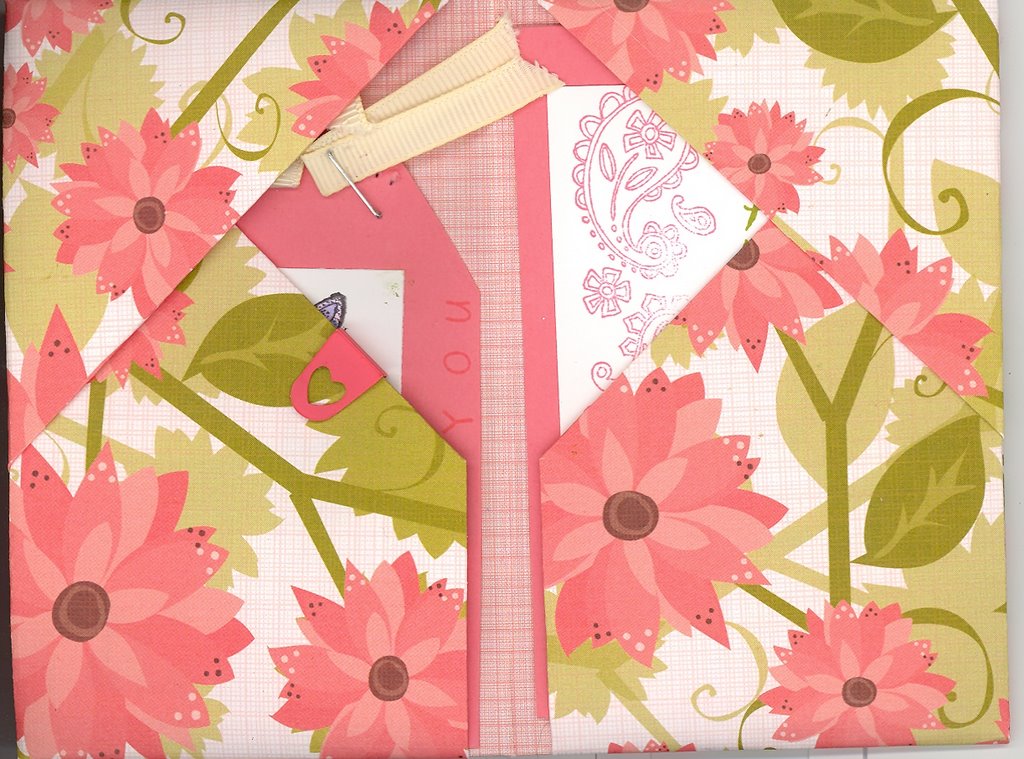
This is a little tag pocket book we learned at regionals. It is too darn cute. I made 8 of them today. (not all the tags for them)
So this little book has 6 pockets when it is finished. I made this for my Secret Pixie. It has 4 tags and the inside pockets have fiber and flowers.
This is absolutely perfect for a gift card, cash, love notes or anything else you can think of.
Best of all....................................I am going to teach you all to make one. Tomorrow i will be posting my first tutorial. These make great workshop wow's, make and takes or even stamp camp idea.
I am making a ton for Christmas to hold those little gift cards! So don't get too excited before tomorrow. I'm sorry this is just too much fun!!!

Hello, I am back from Regionals. I really had alot of fun.
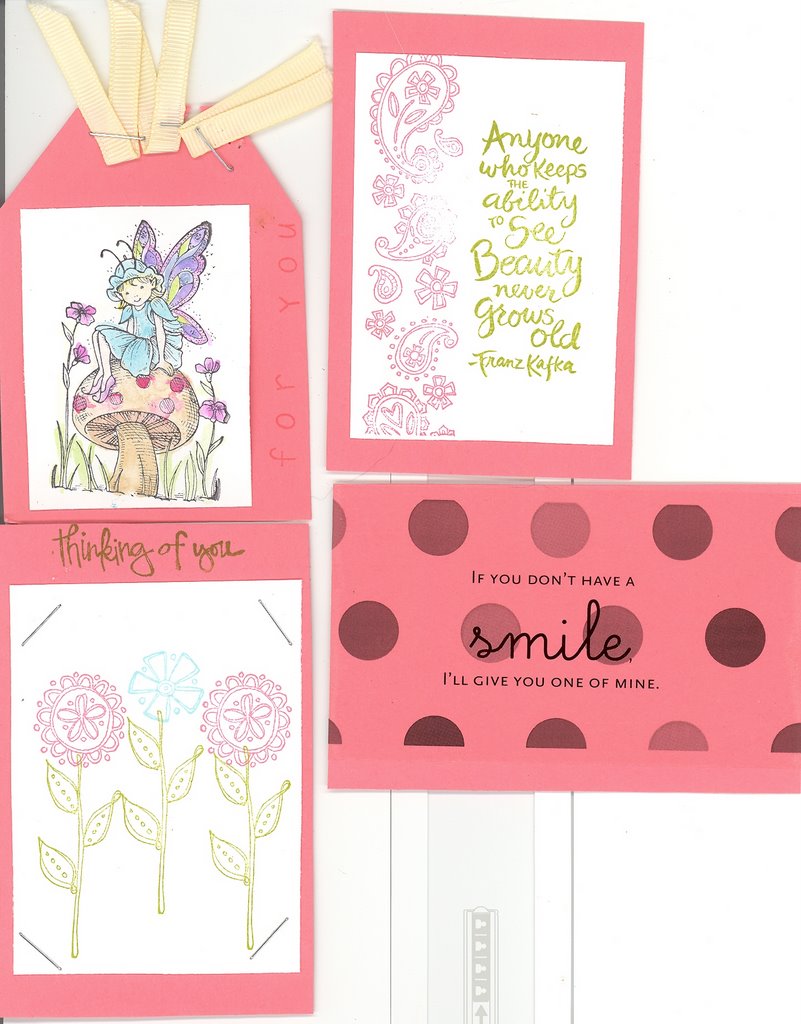
The set we got from next years catty is so cute. But i think my Fave stamp in the set is the paisley!! Love it. This is a project we made at regionals. It is a 6x6 scrap page. the cute edge is made with the 3/4 inch circle punch. Also note the ribbon it is celery or mellow moss. Yahoo, new ribbon we only need to wait til July! Now, that is not fair. Shelli is a tease.
I love the fact everything was pre cut, but the stamping time seemed to short. I still have 3 projects to finish here at home.
This card is so cute too! I love this new set. I want to play with it! I guess i will need too to finish the projects. We did a 12x12 page too! I am going to load it with pics of Laura and upload it tomorrow.
This card is sweet as well. I want to do more with this layout, the paisley is on the inside of the card. then all the strips are applied.
Regional was very informative and I will be adding some wonderful things I learned .
I have some really cool wows to show you.........I am just waiting for the dryer to finish. (hint)
I hope to make it to convention this year, i would like to see the energy of that kind of gathering. Plus I'd have some SCS friends there with me. :)
Friday, October 27, 2006
Wednesday, October 25, 2006
Oh, I think I am in love. With these new Wild Asparagus papers. I was in the hardware store the other day......yes, I did say hardware store! You have got to love being rural. The scrap booking is right next to the guns. My DH Say's that so couples can shop in the same aisle. LOL
They had so many different papers and just to be safe i had to get several of each sheet. This paper is so fab because of the prints, the weight and the texture. Sigh. It's better than chocolate and almost better than (you know what).
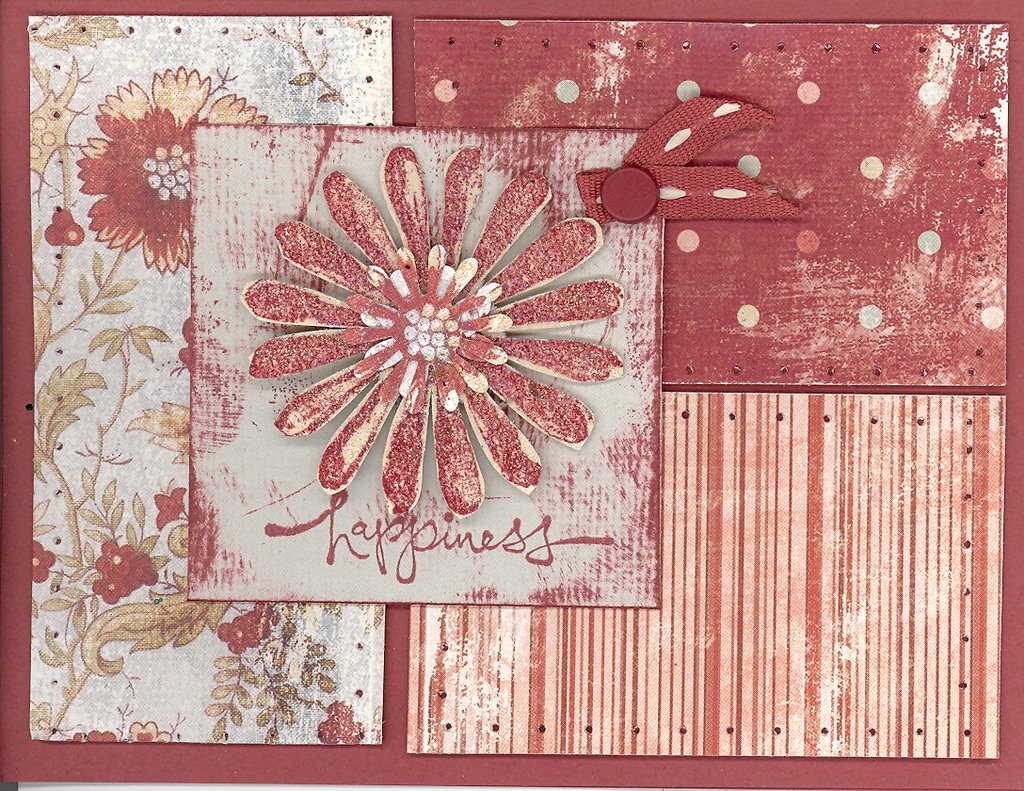
I love this layout. I was fondling my papers this morning and decided I could use a little for this challenge. I cut the pieces with the measurements given in the challenge, then i pierced the edges. The center square is the coordinating paper from the back. I DPT the edges with cranberry crisp. (I love this color so much I hope SU keeps it) I can dream can't I!
I stamped the flower from Looks like spring in Cranberry on natural ivory paper, then cut it out. I pressed it into a versa mark pad and used iridescent ice ep on it. I used the spring bouquet flower punch to punch the center of a flower out from the paper and used it as a center for my large flower. I used the word Happiness because my papers make me happy and being in my space makes me happy!
I am really happy with how this turned out. I will definitely use this layout again.
Saturday, October 21, 2006
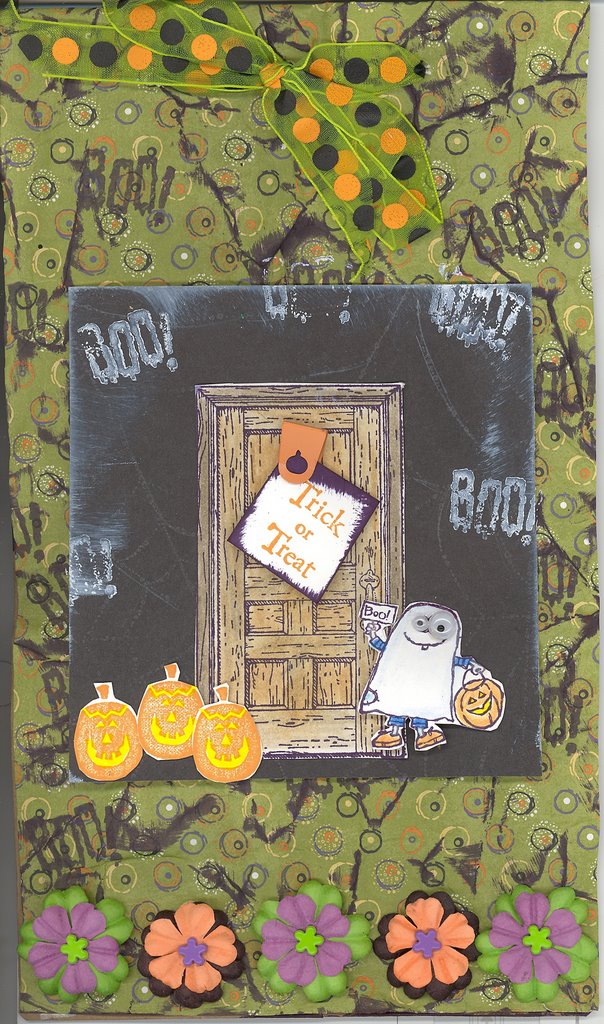
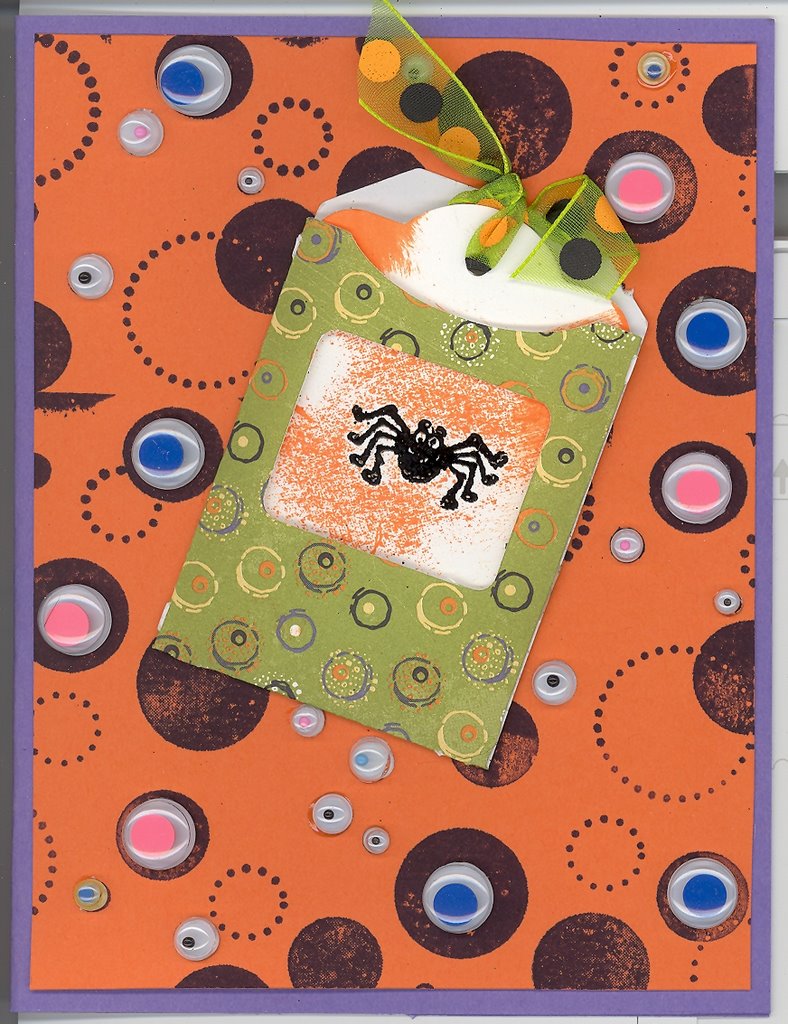
This was made for a challenge on Splitcoaststampers. It is a pixie pre-VSN challenge. We needed to make a treat bag for Halloween. Mine is big for holding lot's of chocolate. Yummy!
I took some of the new Halloween paper by SU and crumpled it up. After smoothing it out I added black ink directly to the paper. I love how it goes along the crinkles. Then i stamped BOO! on the paper.
Next I stamped the door, the trick or treater, and pumpkins. The door and ghost were coloured with prismas and gamsol. The pumpkins were stamped in pumpkin pie ink and yo yo yellow marker filled in their faces. I added some white craft ink to the edges of the black paper, but still felt it was missing something. I stamped Boo! in white craft but it smudged somewhat. Oh well I still had to submit it....that's the problem with procrastination. :)
I added cute little brads to the Halloween prima's and called it done.
I do love Halloween and can't believe it is almost here again.
Friday, October 20, 2006
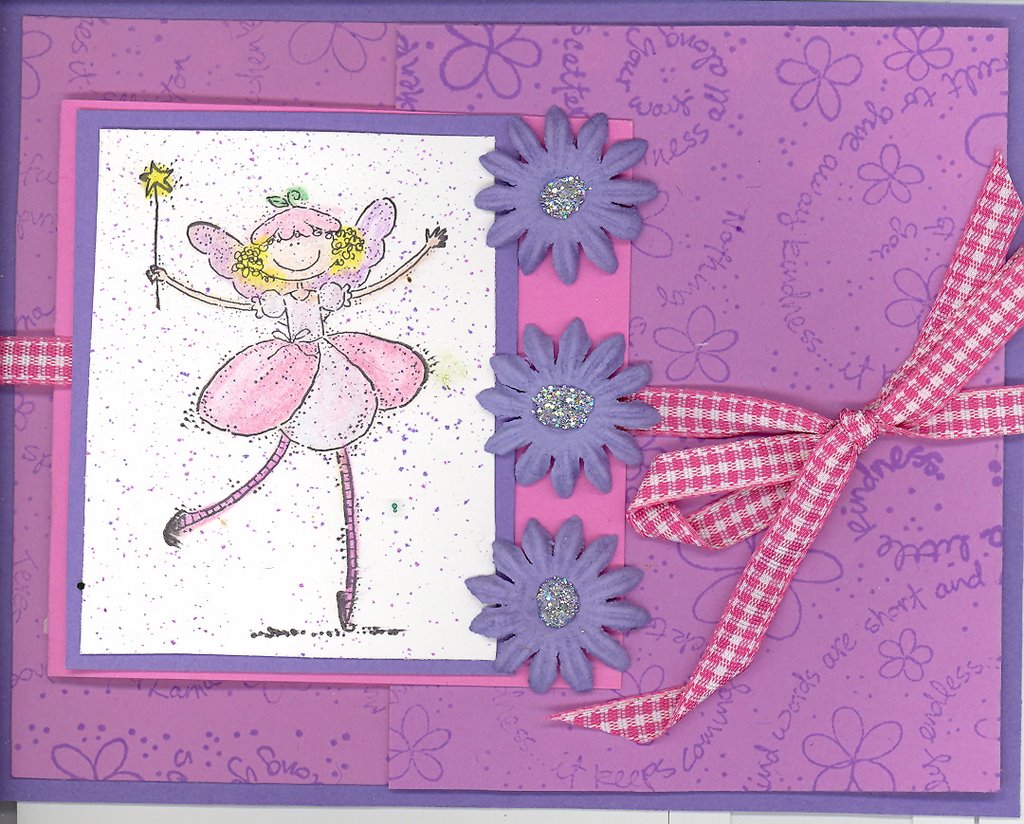
This is a card i made for the Sketch Challenge on Splitcoaststampers. The Fairy image was a rak from my Secret Pixie. It was exciting because i don't have this set.
I coloured the image with prisma colour pencils then blended it with gamsol and blending stumps. I love this technique. Then for fun I took my spritzer tool and spritzed it with Lovely Lilac and Orchid Opulence.
Every Fairy deserves Primas, especially ones that glitter so i added stickles to the centers.
Inside the card it say's............. Isn't Life Sweet!?
Tuesday, October 17, 2006

Well after yesterday, I really thought I had lost it! "IT" being the elusive stamping mojo. The challenge being create a holiday card in non traditional colours. How hard can that be, right? Apparently, brain numbing hard. I still don't have a card I'd be willing to show my dog. (Let alone the stamping public)
Why do we have mojo? Where do we get it? and lastly, How do we lose it? I am just glad it comes back in sporadic bursts.
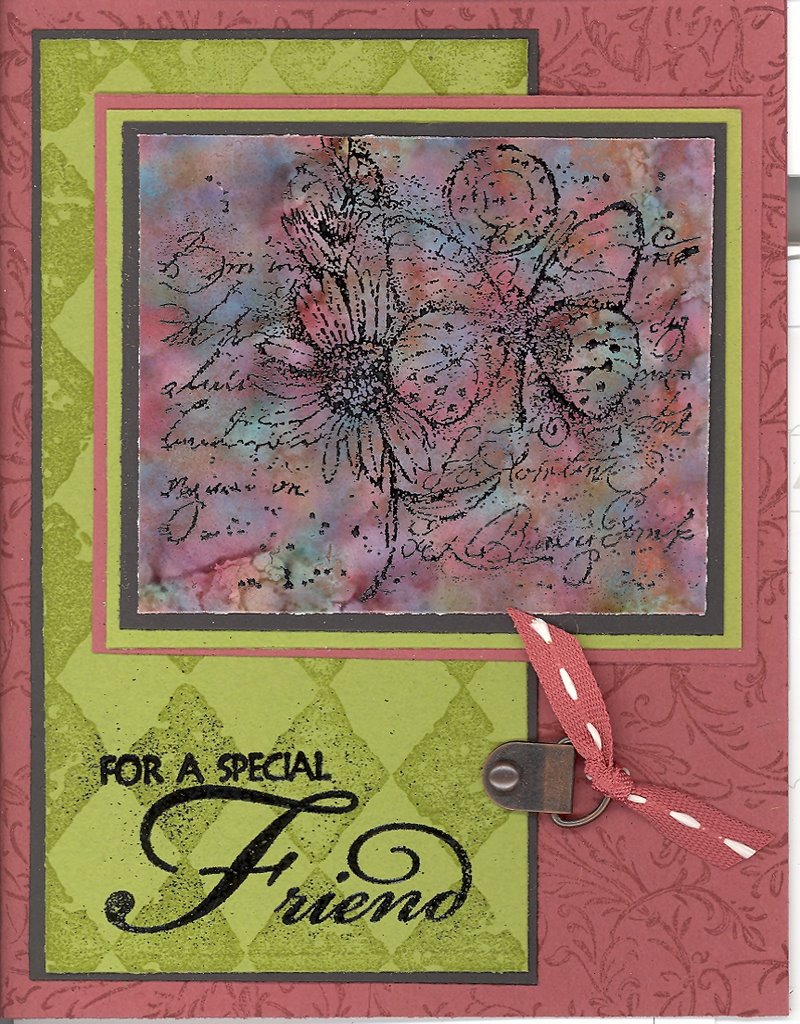
Lucky for me.......the color challenge came today. The colors to use were, Certainly Celery, Blush Blossom and Tempting Turquoise. I love these colors together. On the turquoise layer I stamped Paisley BG in turquoise, then stamped French Script BG over it in Celery. The next layer is Print Pattern in Celery on celery, which is matted in Blush.
The main image is one of my favorite Techniques. Faux Mother of Pearl. To do this you need glossy card stock, lumiere and a brayer and a light coloured ink. In this case celery. You daub the lumiere on your card stock with wadded up plastic wrap. When it is dry you brayer it with the ink. Then wipe the ink off with paper towel. You are left with a slightly tinted paper with pretty sheen. I stamped the image with staz on. After it was dry, I painted in with the aqua painter and ink. It is beautiful and luminous in real life.
Then finish your card.
I think I am going to make this as my swap card for Regional's. It is just 2 weeks away. I can hardly wait. I really enjoy doing this.....I will probably change it a bit but , it's pretty much done. Is it too much? I've never done a regional swap before. I guess i will find out!
Wednesday, October 11, 2006
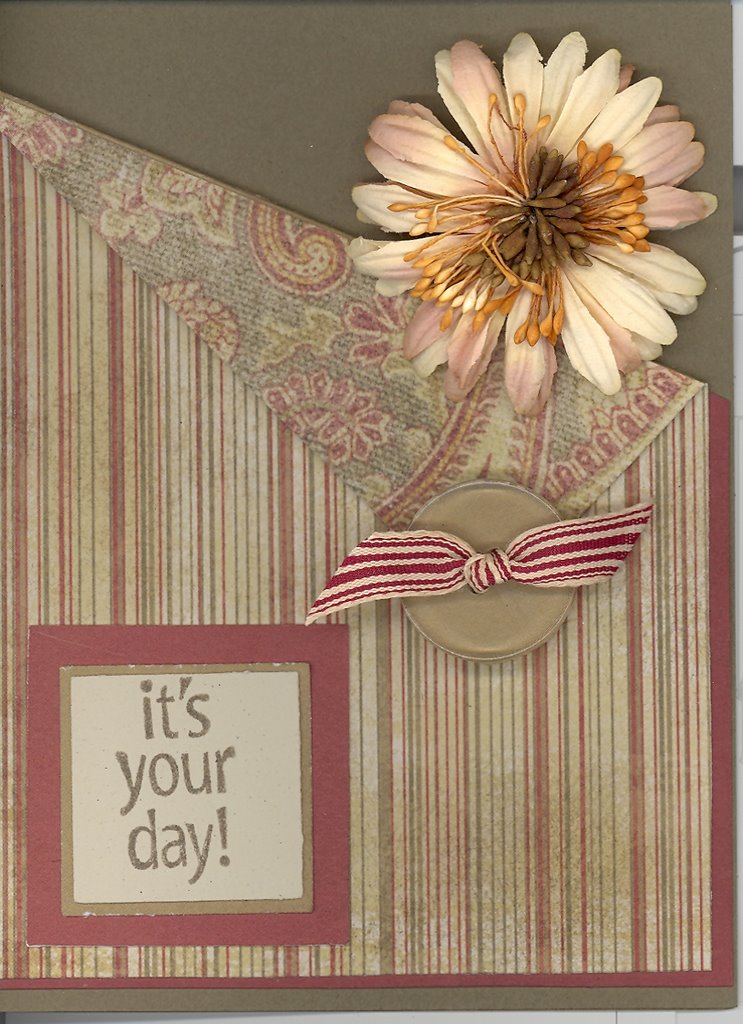 This is the card I did for the sketch challenge on SCS. I love this sketch. I had this perfect paper. Of course it all would have been gone if i could have found it for the top secret project I was working on yesterday. (to be unvailed in Nov.)
 Anyway I love how this turned out. I started with a true thyme card. (41/4 by51/2) then used noel stripe paper by wild asparagus. The backing of this paper is a solid khaki colour. On the fold I covered the khaki colour with the noel paisley paper. I had scraps left after my cricut had been at it!
I matted this on a piece of cranberry crisp paper.
I took a clear button and by using crystal effects adhered a circle of khaki to it. Then tied it with cute ribbon.
I punched squares of the reverse paper and stamped the sentiment on natural ivory.
To finish it off, I topped it with a Prima natural Daisy. I love these flowers and I am starting to run low on them. Guess I will be doing some prima shopping. :)
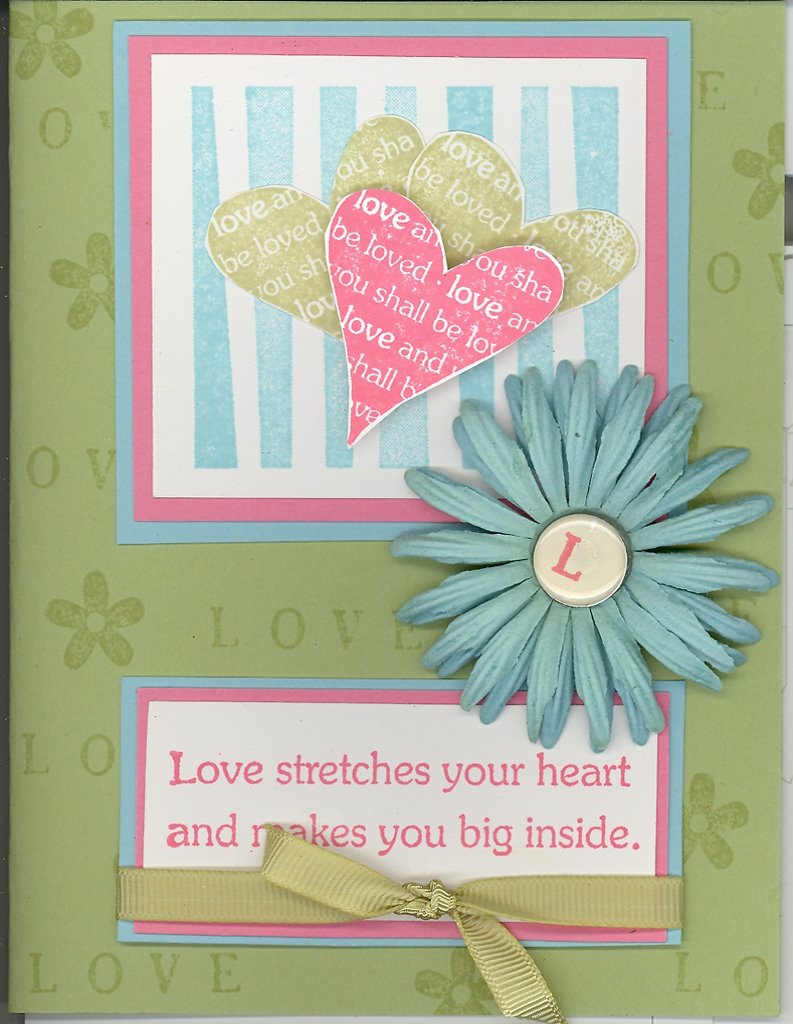
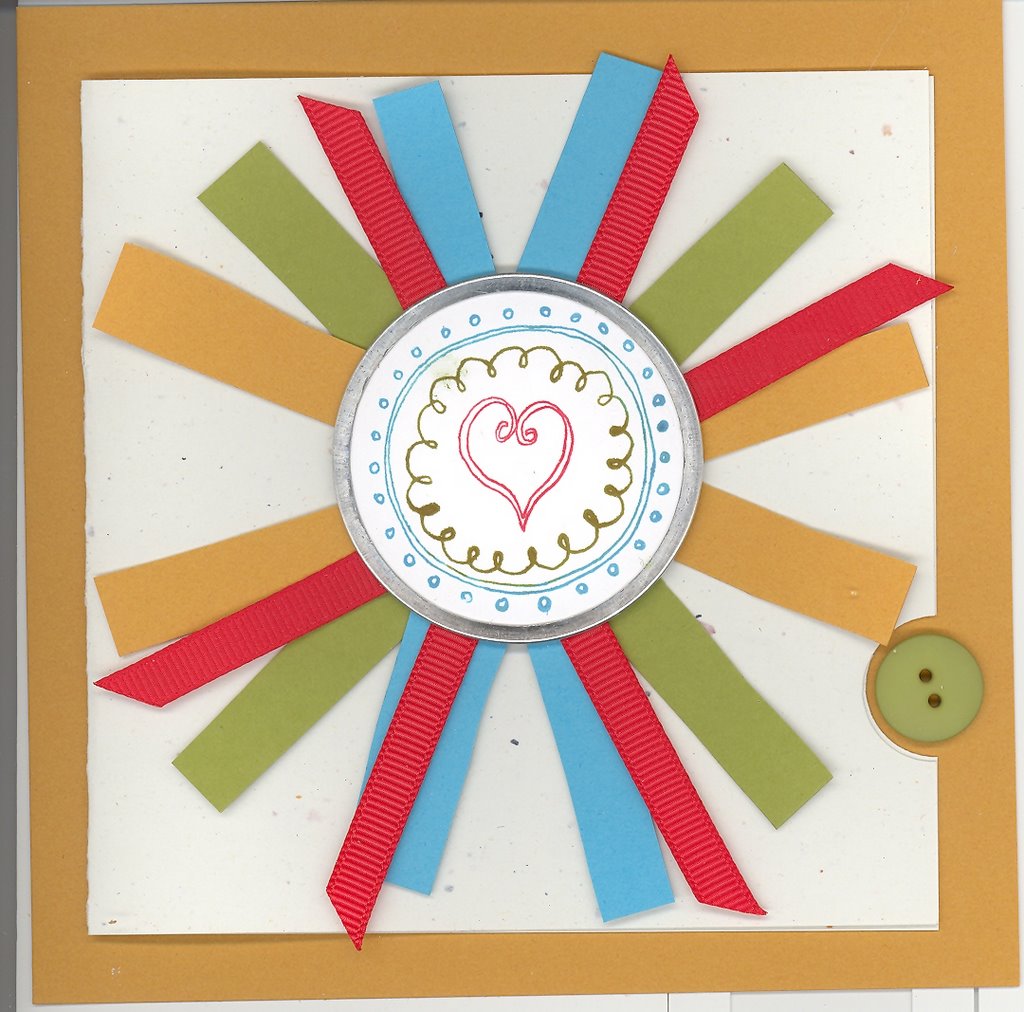
This is my card for this week's colour Challenge. (83) I have my first stampfession. I bought this set Dream come True out of a mini, and never even cut it. It sat and sat on my shelf.....I was going to sell it when, all of sudden it is in the new idea book. So again it sat and sat, until today when i decided these colours said love to me!
So today the smell of fresh cut rubbah, drifts through my stamping room. I really like this set, but it never seemed to get my creativity going. I'm not saying it did today but it's a start.
I used my Karen Foster snap stamps, that my enabler/pusher friends said i needed to have. :) I guess the giant prima is a fact of life. I love all the different colours they come in......I even use them sometimes. But you really need to be prima worthy! I feel that way about pretty ribbon too!
I found ribbon in my stash that is perfect for Certainly Celery, which I used. On the same card was some beautiful Cool Caribbean coloured ribbon. Which will return to the stash until future use.
I am pretty happy with this card. But I feel it demands more play time!
Monday, October 09, 2006
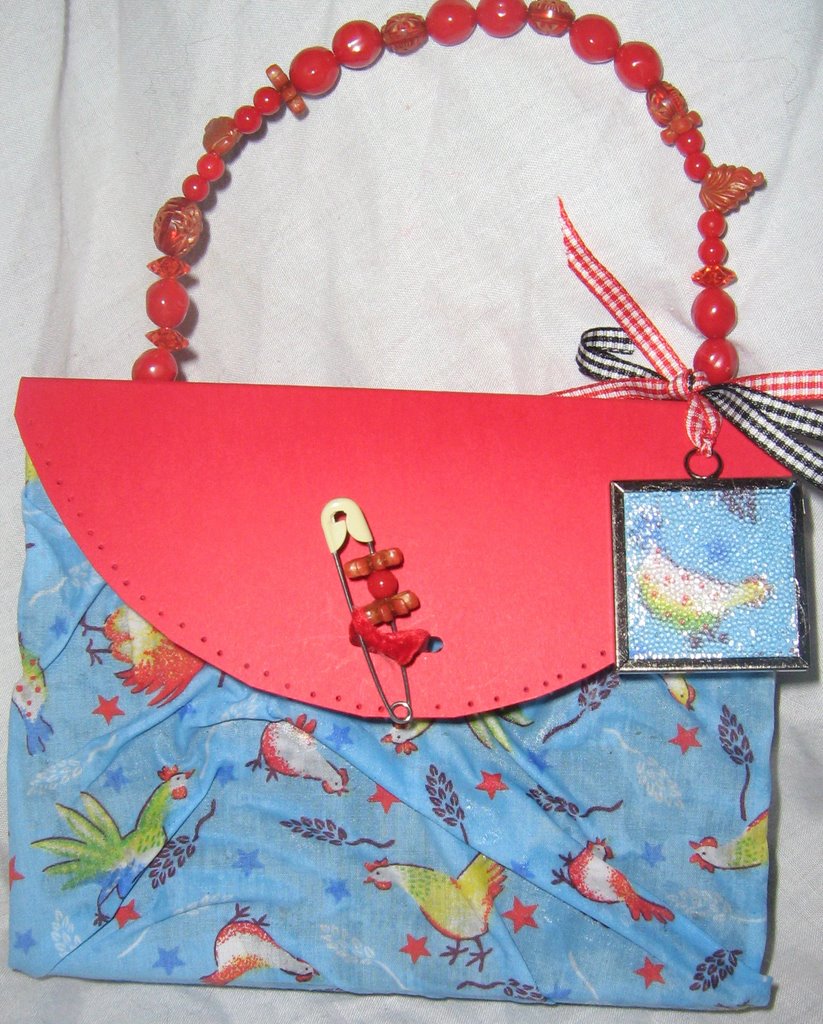
This is a gift for my friend Beth. Beth is famous for her "Look a Chicken" line. When i saw this fabric i knew i had to make her something. I saw this idea in an Australian Scrap booking Magazine.
The instructions were a little sketchy on how to get the fabric to look really nice....but I think for a first attempt it is not to shabby. Plus it's a gift she has to love it!
Plus there was no pattern for the finishing pieces so i had to wing it. The charm is made from a piece of the fabric in between 2 glass slides and it one of the new slide frames. It was then covered in crystal effects and clear micro beads.
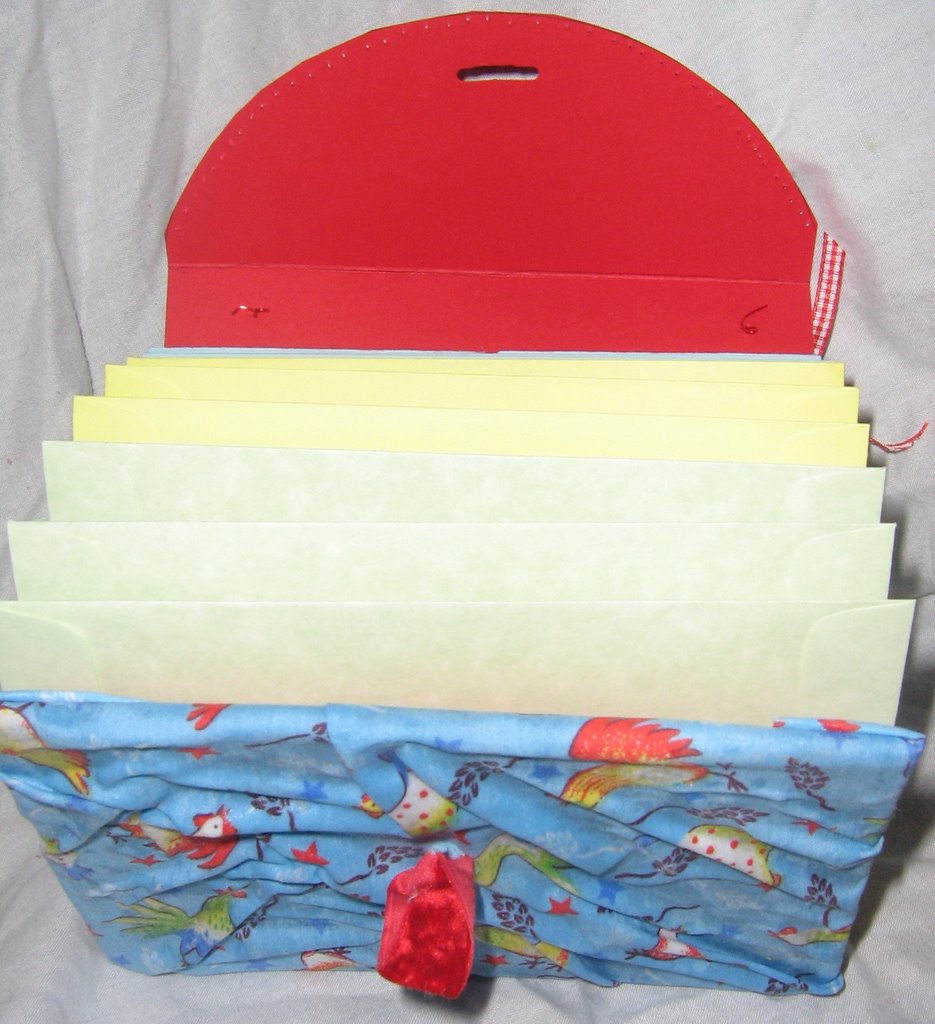
The inside is envelopes glued back to back to make pockets for pictures, quotes, tags or what ever you like. I will make more of them , and improve upon each one. I wish i had the Best of Cluck set. Will need to put it on my wish list.
Once upon a little time a girl named Lisa came
To a thread so nice and fun she decided to remain.
Many friends all tried and true flocked to chat with her
Because she was the coolest redhead in our universe.
And then she found her passion, in flowers paper and silk
They came in tins and boxes, and bottles shaped for milk.
Primas flew into her basket at the online stores
And every time that Lisa bought some, she only wanted more!
A Prima filled coffin to lay her head when time's toll must be met
Is what our Lisa often asks, but she ain't gonna get it yet!
For though her kids drive her to the brink, sometimes each day it seems
We aren't giving her up quite yet, cause Lisa is our Prima Queen!
This was written by my friend Jen! It brought a smile to my heart and a tear to my eye. So I wanted to have it forever, kind of like the prima's I hoard. So Thanks jen this was awful sweet and now it is forever on my blog!
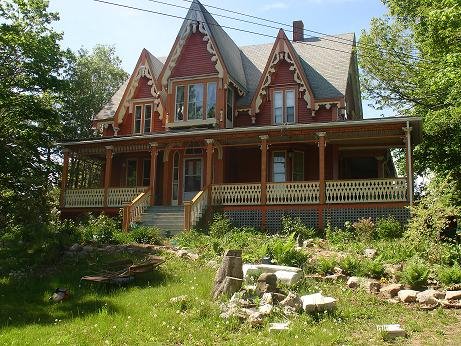
This is our home. It sits on 4 acres, with the Annapolis River to the front and the North Mountain to the back.
Since I love Fall so much we painted the house orange. The neighbours weren't sure at first but they love it now. The main house is painted a colour called Pumpkin Pie, it is trimmed with Gingerbread and Autumn Ridge. The light colour is Belgium Waffle so our house is pretty and tasty too!
I have always dreamed of living in a grand old home. Here I am. We converted the old carriage house into my craft room. So it has everything I need.

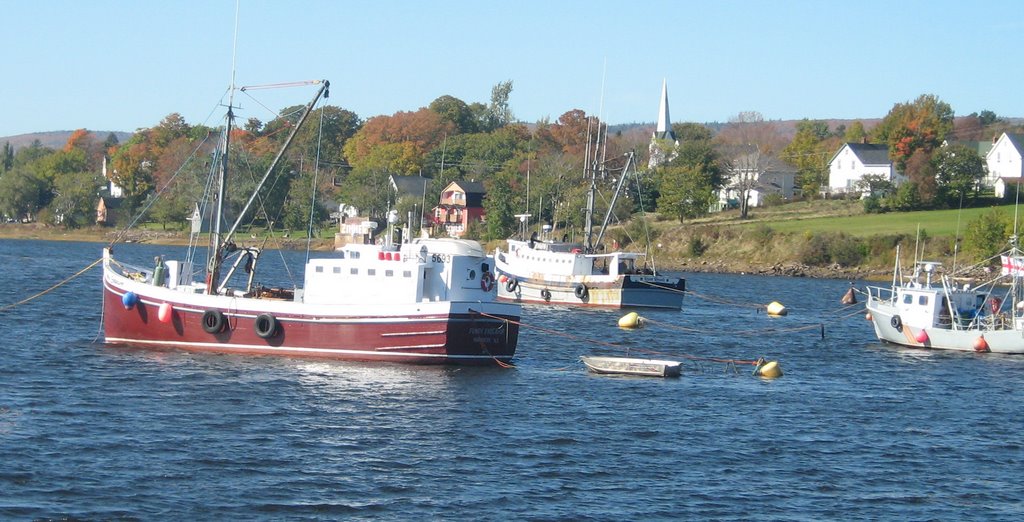

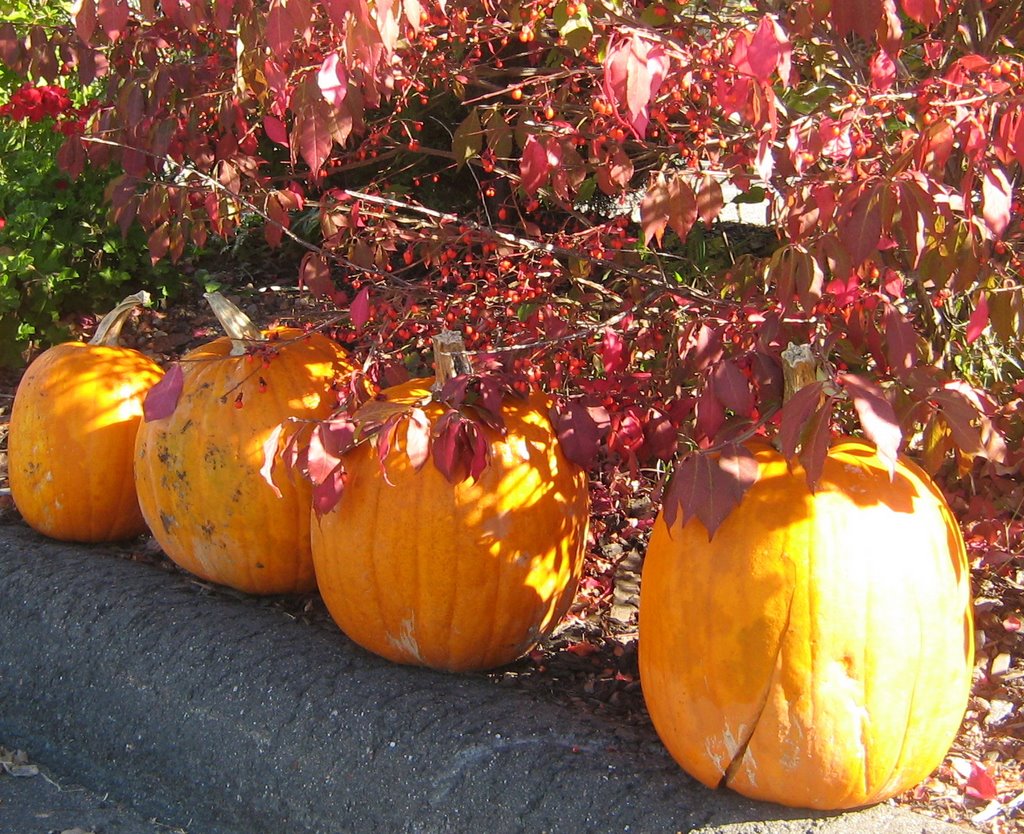
The top picture is at the end of our street. I drive past these fishing boats everyday and i never stop marveling at their quiet beauty!
This picture is taken looking out across the river to the South Mountain. I love sitting on the porch and looking at the beauty of fall!
These pumpkins were just hanging out at the gas station. It looked so pretty!
I would have loved to run away today and just soak up the scenery but apparently my family wanted Thanksgiving Dinner. The nerve.
Happy Thanksgiving.
Thursday, October 05, 2006
On SCS we have a little thing we like to call VSN. I am a VSN junkie! I love it, we are given challenges and then have 45 minutes to create the card or project. They get uploaded then the hostess picks winners.
Sounds easy it, isn't! I have been a hostess before and i am a Hostess this time around. Which is November 10 th and 11th. We can't tell anybody what our challenge is until it's time to create. The theme this time is "Home for the Holidays" and the hostesses are Pixie Princesses. I always wanted to be a pixie or a princess and now i can be both!
We also have Secret Pixie's, I made this card for mine but I can't post it to the gallery until the reveal. But i love it!
I used my cricut to cut the little pocket and window. I love what my cricut can do and am so lucky that my DH understands my obsession with gadgets and gizmos. I really should use what i have more than I do. But who has the time???? I wish i did , but I have taken too much stamping time this week.
But really it's almost Halloween, so who cares if my dust bunnies are the size of small dogs and may be alive . Cobwebs can wait til November, they add a certain Holiday air to the house. Bwahahahahahahahahahahaha!!!
Happy Haunting!

I spend some time at a little place on the web called Splitcoast stampers, or SCS as we refer lovingly to it!
Every week there are challenges posted on Monday we were to make a black and white card. I love making Black and white cards, i just never seem to do it. This one popped into my head and I was really happy with it. As the week progressed so did the challenges, on Wed the challenge was a layout. I reworked this card and used the same(mostly)elements. I like the new card too!
I got the paisley flower from ATRS. It is by All Night Media. I fell in love with it and had to have it. I am sure I will play with it more.
![]()
Wednesday, October 04, 2006

It's beginning to look a lot like Christmas. I know it's not even Halloween yet. But I just couldn't resist making this Christmas card.
The layout came from the new Card Maker Magazine. I just changed the images and colors. A very easy card to make. It has 2 folds so it looks very elegant. At least I think so. I can see visions of cards dancing in my head with this layout.
The scan does not do it justice. I am really pleased how it turned out. Hope you like it too!
Directions:
Cut a piece of card stock 51/2 by 91/2. Score at 1 3/8ths from the left, score 4 inches from the right. Decorate. :) That's the fun step.
Attach sentiment or picture with foam tape so the ribbon slides through to tie the card shut!
Enjoy.
Monday, October 02, 2006
I am so pleased with how this card turned out! I love working with the alcohol inks. They are such a forgiving medium. If you make a mistake you can just keep working it, until you have something you like.
I like to work with a sheet of glossy cardstock cut to 51/2 by 41/4. Then you have a good sized piece to work with.
This is how i use the inks.
1: Spread some of the blending solution on your glossy paper.
2: Attach the felt to the dauber. I drop the inks directly onto the felt. Add a few drops of blending solution and pounce all over your paper. When you are happy with the coverage, add a few drops of pearl, gold, copper or silver to your felt. Add a few more drops of blending solution and add to your paper.
3: Save the felt and dry it! It can be used again just by adding some blending solution to it. It will be lighter in color but just as pretty.
I really enjoy making the alcohol ink backgrounds. I spent an entire afternoon making several. My kids wanted to play too, and they made some stunning background papers. We had fun and I am happy that my kids like to stamp with me. I just wish they would tidy up! Although they are geting better at cleaning the stamps they use.
I wil soon need to make more back grounds. Yippee!
Subscribe to:
Posts (Atom)